DemoBuilder
Active Directory Setup
You probably noted, the more we advance, the less screenshots I’ve taken. Let’s ignore that and continue to install AD.
First we will go to the DC01 VM page on azure and click Connect, then on the dropdown select connect, and it’ll offer to download an (native)RDP file. On the VM IP Address, Make sure to select the Public IP (the one that doesn’t starts with 192.168.xxx.x). Do it and open it. If you see this screen below that means there’s an misconfiguration and you should yell on the training asking for help. 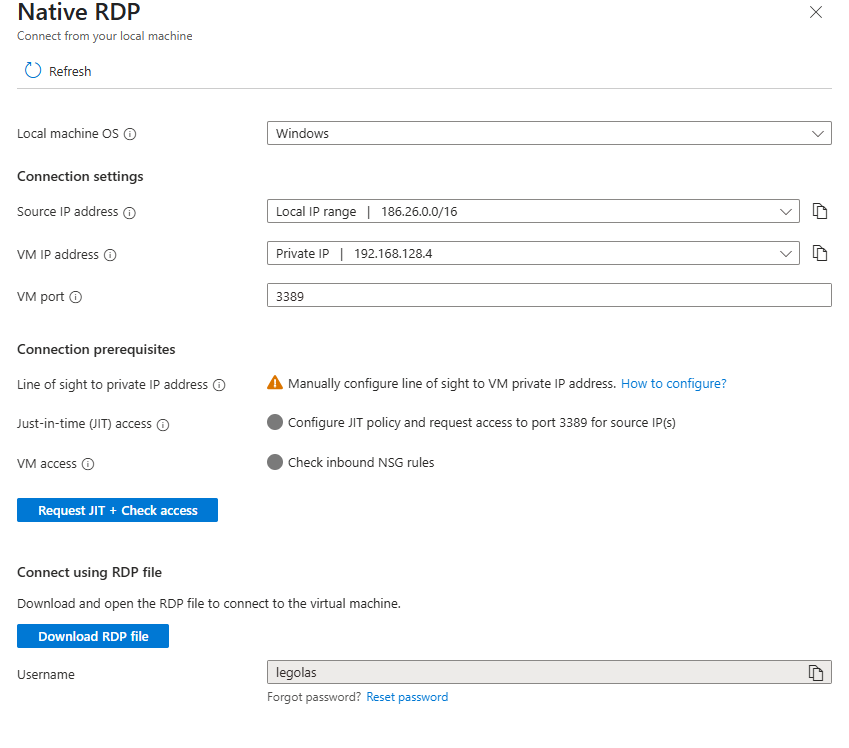
This is what it looks like when your VM doesn’t have a Public IP. In my case is by design, but I already have Entra ID Private Access and disabling just for an screenshot wasn’t in the plan
DC01 Roles and promotion
Once connected to the VM, first thing you’ll see is Server Manager. Its going to be there all the time, every time, so you might as well take a look at it. Here, we will change a couple of things on the Local Server tab:
- TimeZone to reflect yours
- Internet explorer protection something something make sure is Off for Admins
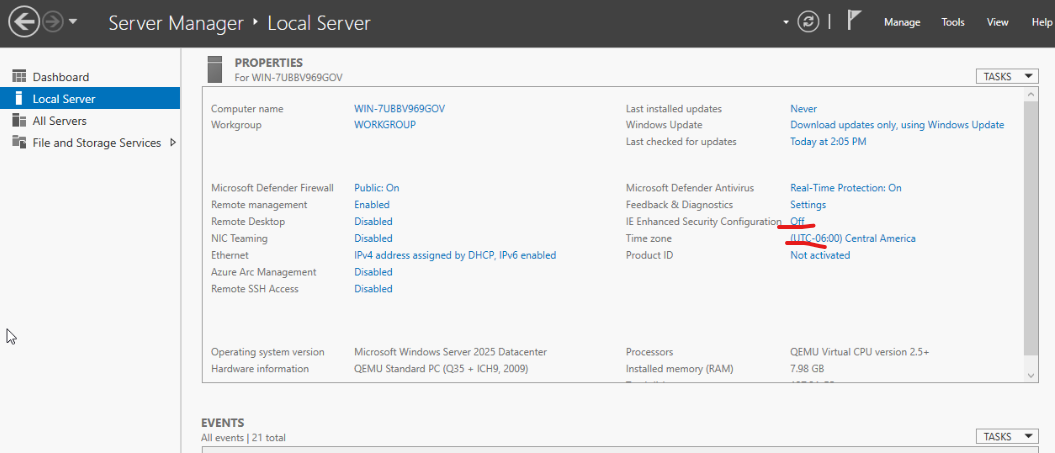 *Some stuff won’t match, I’m using a local hypervisor, ran out of Azure Credits while writing this down. **Also, these two previous steps, do them everytime you connect to a new Windows Server freshly created. You’ll thank me later ** *
Roles Installation
- On the server Manager, click on the top left, Manage, and Add Server Roles and Features:
- On the Before you Begin, click Next
- Installation Type, maintain “Role-based or Feature-based…” and click next
- Make sure your server is selected as the destination server, click next
- On the Server Roles is where is at. Select Both Active Directory Domain Services and DNS Server. Make sure is not the lightweight version of Active Directory, nor any other weird stuff.
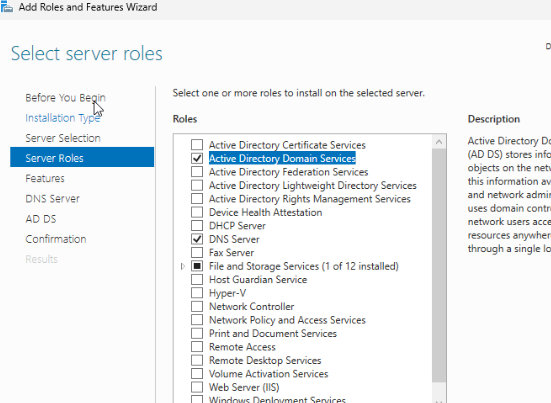
- Every selection you make on the Roles page, will bring a confirmation about installing additional features, mostly management. Select them, they are important.
- DNS will complain that your IP Address is DHCP/Dynamic. In Azure, While a VM is alive (ie, not deleted) it’ll maintain the same IP so its like it was an Static IP Address, so lets simply continue.
- Click Next
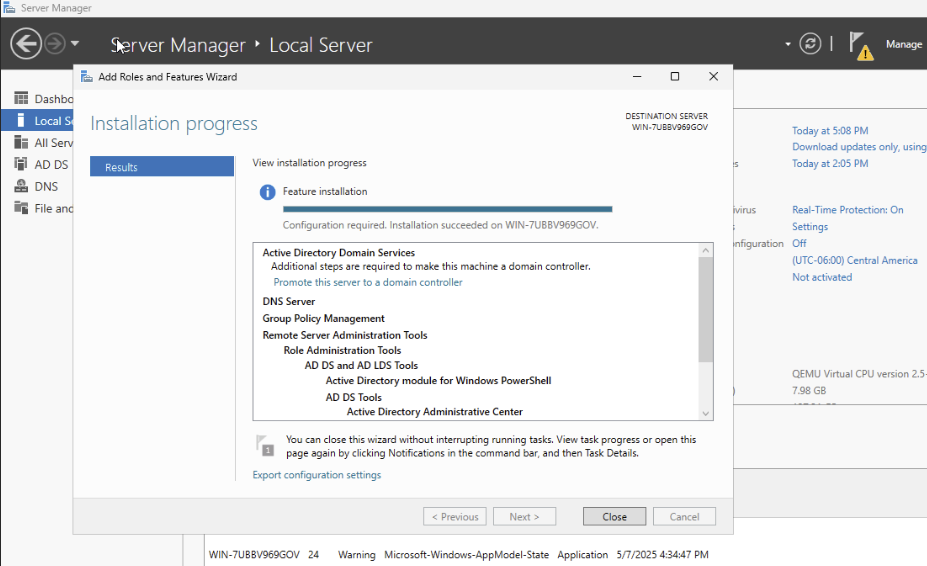
- On the Features selection, we don’t need to change anything as the roles added the needed features already, so just click continue until “Install” and hit it.
- When done, there will be a message to promote this server to a Domain Controller. Click on it or simply read the next section. Or Both.
Domain Controller Promotion
This is the last time you can check you’re doing all of this on the DC01 server. You really don’t want to realize now you’re doing it on the CloudCon or any other. Promoting a server means making it part of the Domain Controllers. Since we don’t have any, this time it’ll be also when we define our Active Directory Forest and Domain, so it’ll be a fun 2 step process. All of this is done on the dcpromo.exe wizard(its not really called that anymore), and you can open it AFTER the roles are installed by clicking on the notification on the Server Manager, and clicking “Promote this server to a Domain Controller”.
- On the wizard, the deployment operation should be “Add a New Forest”.
- The Root Domain name we use here should be a FQDN, even though we have no DNS for it, and should not be Internet-routable.
- If we go with Microsoft example, it could be “corp.something.com”. I’m a bit more creative than that, so I’ll use for this example it’ll be rivendel.elfcorp.com (assuming I own elfcorp.com and I have it added to Entra). Click Next
- Forest and Domain Functional level should be 2025, there’s really not reason to downgrade it since we don’t have old servers.
- the Directory Server Restore Mode Password is important for later. Add it here. Make it safe, but more importantly, remember it. Click Next.
- You won’t be able to create a DNS delegation. That’s fine, click next.
- The NetBIOS name will be the first part of your domain name, excluding the dot. In my example, it’ll be RIVENDEL (NetBIOS name are upper case). If you’re wondering, when you write your username as Rivendel\Iluvatar, that’s a NetBIOS name; that’s less useful by the day though. Click Next
- This is when we are going to pause just a bit, but only if you added an additional disk in the previous step. If you did, then follow this steps, otherwise, just click next and go to step 7
- Leaving the Wizard Open, click start, then search for disk management
- On the Disk Management screen, right click on Disk 1 (the one with the storage unallocated), and in order bring it online (if needed), Initialize it (using GPT), and then right click on the empty space and create a new simple volume
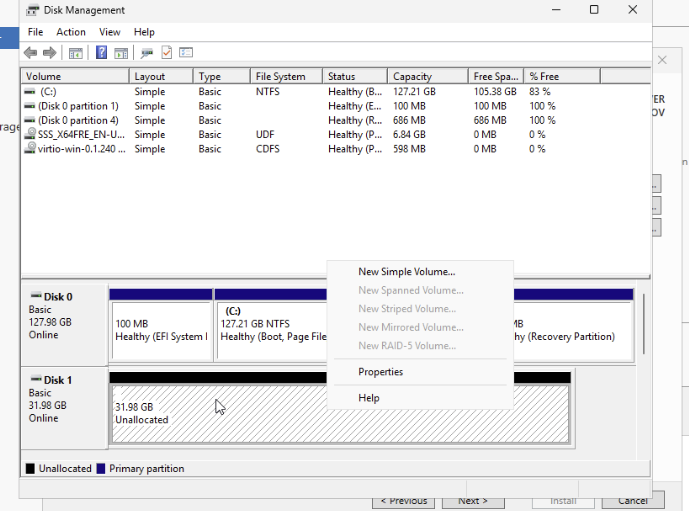
- Follow the wizard leaving all default, making sure you assign a letter like Z:
- Format the drive as NTFS, Default Allocation Unit and a label like “AD Stuff”. Make sure its a quick format.
- On the list on the top, when the format finishes you’ll see the disk as “Healthy”.
- Come back to the DCPromo Wizard, and simply change C: for the letter you selected in the disk before in all 3 boxes
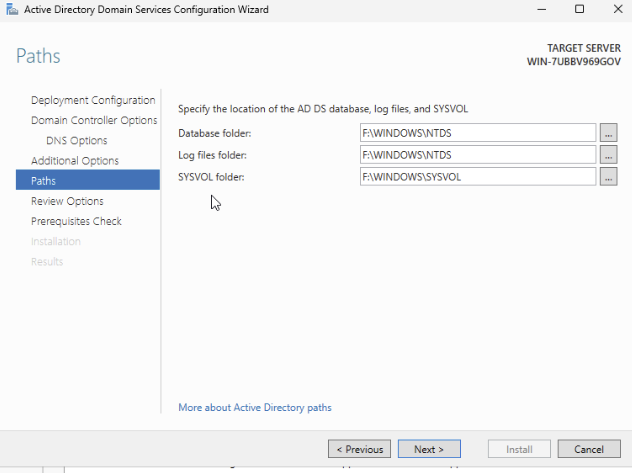 . Click next
- Review and download the script if you want; script is useless thought, doesn’t make sense to save it.
- On the verification of pre-reqs you will see warnings about Dynamic IP instead of static (discussed before), no delegation for DNS. If you see any errors then come back and check again. Click Install
- Once the AD Installation is complete, you’ll be asked to restart, and that would be it. You have AD.
On the next login you might want to change your user. In this example, my login user is called Iluvatar, and my domain is rivendel.elfcorp.com. So to login again next time I’ll use either rivendel\Iluvatar or Iluvatar@rivendel.elfcorp.com. Either way should work, and the same password as before.
Before leaving the AD for a bit, we need to do a couple of settings change on both our user and the whole Forest we just created.
Domain Suffix
A suffix in a domain is simply a label you can have for your users. Best example is elrond@elfcorp.com, most likely his full account is something like elrond@rivendel.elfcorp.com, but we want him to avoid having to use rivendel.elfcorp.com every time, so we add a valid suffix for the domain, in this case, elfcorp.com, so we can have Elrond’s account to be elrond@elfcorp.com. His Netbios account will still be rivendel\elrond, but this way Exchange Online can create him a fully working email address, and he will save a few keystrokes here and there.
Once rebooted and logged in again on DC01, you’ll have your Server Manager again open, that’s fine, let’s use it:
- On Tools, search for Active Directory Domains and Trust
- You’ll see an MMC with a description and a single node, right click on “Active Directory Domains and Trust” but not on the domain name, but the one above (it doesn’t make sense yeah, I didn’t design it) and click Properties.
- Only thing you can change here is adding more UPN Sufixes. Add here your FQDN you purchased from GoDaddy (or wherever) and click Add. In my example, my AD Domain name is rivendel.elfcorp.com, so I’ll use here elfcorp.com (lowercase is fine)
- Click OK and close the MMC
Changing Admin User UPN and Users stuff
On the Server Manager, click on Tools again, and then open “Active Directory Users and Computers
- To make things simpler to manage in the future, right click on the domain name, New, Organizational Unit.
- Name it something descriptive, like DemoUsers. Leave the “Protect container…” checked.
- Inside this container, you should create all the demo users you want, including if you want a different administrator or a fancier username. Since I’ve used Iluvatar as my creation user, I’ll create a new one here, let’s say, JP
- To create users inside the OU we just created, select it and right click and New - User
- The only required data for a new user is a Full Name (equivalent to Display Name in Entra) and the Logon Name, UPN; make sure to select the right Sufix we created earlier. For this example, I’ll use this
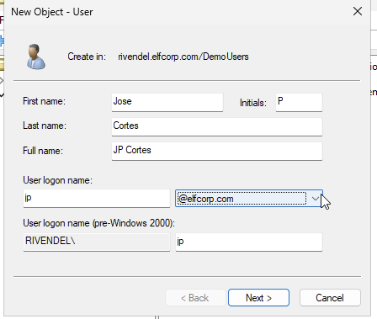 . Click Next.
 - Type out a Password you’ll remember (there’s no rules against re-using demo passwords), and uncheck the “User Must change password at login”, and check “Password Never Expires”. Click Next and Finish and the user will be created.
- To add this newly created user to admins and giving them greater power than the One Ring, right click on the user and select Add to Group.
- Add the groups: Administrators, Domain Admins, Enterprise Admins. Hint: Type the first few letters of a group and then click Check Names so the dialog autocompletes it and adds the required semicolon. You can add multiple groups at the same time.
- The only required data for a new user is a Full Name (equivalent to Display Name in Entra) and the Logon Name, UPN; make sure to select the right Sufix we created earlier. For this example, I’ll use this
- Finally, for a group we might end up using later, right click on the OU you created and create a new Group
- Name it: PIM-Enabled-Admins. Leave the Scope as Global and the Type as Security. Click OK to create it
- Right click on the newly created group and select Properties (double click on it works as well).
- On Members tab, add both your users: the initial one, and the one you just create it. (same trick with the check names as before) and click ok.
- I won’t have instructions here, but you can go to the Properties of the initial user (which will be inside the “Users” container), and under account change the LogonName/UPN to use the Sufix. You’ll have to re-login again, but in the future we should not be using this user anymore as it is too powerful.
- To create users inside the OU we just created, select it and right click and New - User
Final AD Stuff: Change Site Name
This is merely decorative, but fancy and shows that you know your stuff. On the Server Manager, go to Tools, and select Active Directory Sites and Services
- Expand sites if not already
- Right Click the “Default-first-Site” and rename it to something like “Azure Site”.
(if you ever end up connecting this to other site, you can create new sites and assign them subnets. Right now, all subnets will be under the site “Azure”).
You can now disconnect from the VM
Adding the DNS to Azure VNET
- On the Azure Portal, go to Resource Groups, OrgName.Networking and click on your Virtual Network
- Under Settings, click on DNS Servers
- Change the selection to “Custom” and on the first DNS add 192.168.100.4*
- On the second one, add your choice of public DNS, like 8.8.8.8 or 1.1.1.1
*This IP is assuming your DC01 server was the first one to be created, and that you selected the right network. If not sure, check your DC01 IP from its VM Blade. This is a private IP.
For the future: this is the simpler way. You could leave Default Azure DNS which is useful if you end up using privatelink, but you won’t be able to resolve your DC IP, add new servers to the Domain, and more. The fix to that is using DNS inside Azure that resolves both. Check with me later if you want to go that route.
Join your first VM to the Domain.
Before moving on, let’s test if the domain works. Find your second VM in the Azure Portal.
- Make sure CloudCon/VM2 is on,
- Under Operations, click on Run Command
- Select IPConfig Command and click run and wait for its response.
- On the Response, DNS Servers, first one should be the one you just added.
- If not, then select the command “RunPowershellScript” and run this:
ipconfig /release ; ipconfig /renew ; ipconfig /alland wait for the response. This time, it should have your DNS there.
- If not, then select the command “RunPowershellScript” and run this:
- Now, take the entire next script, copy it into Notepad, and edit the first 3 params maintaining the “”.
```
Define the domain and credentials
$domain = “yourdomain.com” $username = “yourusername” $password = “yourpassword”
Convert the password to a secure string
$securePassword = ConvertTo-SecureString $password -AsPlainText -Force
Create a PSCredential object
$credential = New-Object System.Management.Automation.PSCredential ($username, $securePassword)
Join the computer to the domain
Add-Computer -DomainName $domain -Credential $credential -Restart
Output the result
Write-Output “The computer has been successfully joined to the domain $domain and will restart now.” ``` Note: this will save the execution details, including your clear-text passwords, on Azure Logs and the VM logs. It should be fine for you as this is a demo environment and all that, but never told a customer to do this
- Use that script again on the “RunPowershellScript” and if you inputted your data correctly, this VM will be joined to the directory and should be restarting now. Next, use your admin user credentials to RDP into it for the next steps.